Thursday, 23 May 2013

Colorful coaster - pattern

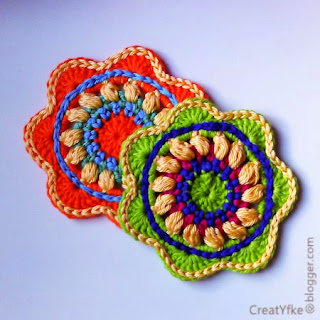
The pattern to a colorful coasters.

Note: in row 5 you will be making puff stitches. These should not be too tall, because otherwise the coaster won't be flat: the inner 4 rows will bulge as you can see in the green coaster.


1. Magic circle
2. Ch2, 13dc
3. Ch1, (sc, ch1), rpt
4. Ch1, (hdc, ch1), rpt
5. Ch2, (puff stitch of 3 loops, ch2), rpt --------- Note: don't make the puffs to tall.
6. (3sc, ch1), rpt
7. (sc, 8dc), rpt. Fasten-off and weave in ends.

Then:
Sc through row 7 using same color as the puff stitches in row 5
Sc through row 6 using same color as row 3.

I have used standard cotton yarn on a 3mm hook. The coaster is about 8.5cm.
Pattern is in US terminology.

As always I'd like to know if you have any problems following the pattern.
I'd love to see how your coaster turned out!


New find

Passed the thrift store again.
I just love these old sewing thread spools.


There were also some old cards with wool, vintage pins and some other things. Can't buy all of it, unfortunately.
For now this spool will have to do. 

Drawing crochet motifs on the PC

When sharing or filing a pattern, it is good to have a motif or chart.

I have just started to draw them on the computer.
There is dedicated crochet software available for sale on the web, but a free one is for example Inkscape. It is much like Adobe Illustrator, but free. This is open source software.
There are some tutorials on the web and YouTube to learn the basics of this program.

I am still learning, and am determined to master Inkscape!
If you see any of the charts I have drawn, please don't be harsh!

Once I get the hang of it a bit more I will write a tutorial.


Monday, 20 May 2013

Small star coaster - pattern


Material:
Two different colors of cotton yarn
Crochet hook suitable for that yarn
Tapestry needle

Gauge is not important.
I used Phildar Coton 3 on 3mm hook, making the coaster 9cm (3.5inch)


Front:
Use color 1.
1. ch5, join with slst
2. ch1, 15hdc, join (=16st)
3. ch1, 1hdc, *ch1, 2hdc*, rpt**, join

Change to color 2.
4. In ch1-space of previous round: ch1, 2hdc, ch1, 3hdc, in following ch1-spaces: *3hdc, ch1, 3hdc*, rpt**, join
5. ch1, *in ch1 space of previous round: (3hdc, ch2, 3hdc), 1sc in space between the 2 hdc clusters of previous round*, rpt**, join and weave in ends


Back:
Use color 1.
1-2 as front piece
3. ch1, *1hdc, ch1*, rpt**, join
4. ch1, 1hdc in each st, join
5. ch2, 2dc in each st, join
6. ch2, *1dc, 2dc*, rpt**, join and weave in ends


Joining:
Use color 2.
Join both pieces with good side facing up. (good side of back piece to wrong side of star)
Sc around, joining the point of the star on every 9th sc, join and weave in ends.

It is possible that the star is a smidge too small at first sight. It is easily corrected by ironing the coaster or by simply placing your hot teapot on it.


Hope you enjoyed making the coaster!

Please let me know if you have any problems following the pattern.


Sunday, 19 May 2013

Small star coaster

A couple of days ago I made the turquoise/creme colored coaster for my teapot.
Now I made a matching small coaster for my tea mug or cup. This one is my own pattern but obviously inspired by the bigger one described in the previous blog post.


It was a bit trial and error and frogging. Now I am quite happy with it. Maybe a small adjustment is needed: the star could be just a bit bigger. 
So maybe in the next version I will use DCs in the last row instead of HDCs.

Edit:
After I ironed it with my tea pot the star did not pull at the corners anymore. So I think I'll leave the pattern as it is.

Pattern will follow...

Thursday, 16 May 2013

Thrift store

I passed a thrift store today. Okay, entered a thrift store today.
Been there before, so I knew where to go: straight to the first floor then to the right. There is a little corner for crafts. A few other people were going through the things there, so I went somewhere else first. When I came back I had the corner all to my self as it where. All the time in the world to look in all the baskets etc. At first sight I could not see anything interesting.
I have been looking for these large safety pin like knitting stitch holders. Not urgent, but I did want them. Nothing in the baskets. Looked at the bucket with knitting needles. What a mess: non matching needles where bound together with sticky tape and rubber bands. Loads of bent needles. But looking closer I did find something at the bottom of the bucket: a stitch holder! And another one, a fancy one! And a couple of cable knitting needles.
Spent all together approximately €1.50 on knitting items. Here a selection:


For some time I have been looking at 'kantklossen' or bobbin lace making for some time. It is one of those crafts not many people practice any more. My grandmother used to do that. Unfortunately she fell ill when I was approximately 12 and passed away when I was 16. At that age I was not yet interested in learning the crochet, embroidery, bobbin lace and other skills she had.
Today I have found 14 bobbins at this thrift store for only €1.50. They are all plastic, but it is nice to see if it is a craft I really would like to master without spending loads on a new kit.


I did wonder what yarn to use. Had not really thought of that. Fine yarn is quite expensive. I did see some industrial size fine yarn in the store but it looked dirty and old, so I left it.
Later after I payed for my haul I thought this yarn would actually do fine for a bobbin lace try, just like the plastic bobbins would do. So I went back and bought two of them. In the car I noticed that a third one was lodged inside another one. I managed to get it out and it was nice and clean white yarn.


(the yarn looks much dirtier on the picture than it actually is)


Many yards and many hours of lace making for only 2x 1.20€ (yarn) plus 1.20€ (bobbins).
I looked up the brand of one of the spool of yarn: Claus Garen, made in Holland. Apparently it was a manufacturer that closed its factory in 1962. First I thought it was ugly dirty yarn, but now it grew on me. I like it. It is a bit of history, something old, like the bobbin lace technique is. At some stage I will do a little project maybe a bookmark or so, knowing that this yarn is older than I am, that it is from the time that many more people used to make beautiful fine lace using this 'extincting' technique.
The other spool of yarn is Italian. Can't really find any history on that spool.
The yarn is very thin, maybe too thin, and I think it's polyester, but who cares, I can play for hours and hours almost for free.
I'll just remove the dirty outer layer of yarn from the spool.

Also on my search I found some beads. Pearls by Gutermann. A good brand. Not sure yet what to do with it, but I will find a purpose for it some day.


These crystals were only 30cts, could not resist. They are now in the window. Am waiting for the sun.


Flower curtain

Spring has sprung, trees turning green outside.
Inside just one plant, no flowers. I did have some crocheted flowers on the wall, but I took them down this weekend.

So new plan: add some color somehow.


PIC crystals


I found some crystals which I hung in the window. That would give nice colors when the sun shines on them. I also used the two pink crystals I bought recently at the thrift store.
It was still a bit bare. And again I had been looking at garlands etc for some time. Wanted to make them but never did.
I designed a simple flower, made a few in several colors and added them to the crystal curtain.
It looks lovely. The flowers blowing in the wind, and the sun playing with the crystals.

PIC flower
PIC chart
PIC curtain

Used: |
Cotton yarn in various colors
2mm hook.


Wednesday, 15 May 2013

Coaster

I am trying to make more things and surf less on the internet. I can spend hours and hours on Pinterest and all the crochet websites.
It is actually such a waste of time, although I do learn a lot by looking at the designs, and looking at the stitching technique etc.

On my to make list was this coaster. (pattern here)
I needed one for my teapot. I wanted it to be round. I really liked this one. The colors are very nice. I was not to sure what size it would become but it turned out just right: 13cm. That's without the scalloped outer edging.


Following the pattern I noticed that the coaster was not flat: it curled quite a bit after the 5th and 6th row. I did continue to follow the pattern literally but intended to make the next one a bit different. The last step of row 6, the CH1, 3DC, CH1 seems a bit to wide. I might try 4DC without the two CH1s. When the coaster was finished it looked actually not as bad as I thought it would.

Another thing I changed:
When joining the two layers the pattern says both back sides should be together, but I changed it: both layers have the nice side up. I will never use it upside down anyway.

For some reason the bottom piece ended up having 92 stitches in stead of 96, so the points of the star were 11 or 12 stitches apart. Doesn't really matter: you cant see it anyway. But it does annoy me that I made a mistake somewhere. This time I am not going to look for it. :D

Used:
Phildar Coton 3 turquoise and ecru, 3mm hook


Sunday, 12 May 2013

Playing with thread

Bored. So played with sewing thread. Seeing how small I could go.

The pink flower is DMC 30 on a 0.65 mm hook. The white one is polyester sewing thread on the same hook.
Pattern here


Sunday, 5 May 2013

Stuffed animal: to post pics or not?

Am now doing a small knitting project.
It was supposed to be a naive small bunny or bear or what ever animal. A small stuffed toy. I planned to use it to as a sort of wedge under my smartphone to get the phone in a more comfortable angle for internet surfing in bed.

I made the faceless body and left it for a couple of days. I planned to knit a girlfriend for him later. I also planned to knit a sweater for it and give it a face. But what to do with the bottom half: trousers or long sweater to cover its non-existing private bits?
Then I decided to give him a complete set of private bits. Why not?

Yesterday I have attached them and it looks very funny and -if I may say so- very well executed. Me, the creator -not with capital c- made a design flaw though: the poor guy can't reach his bits because the arms are to short.

Anyway, do I post pictures and details or not? Do I blur the bits?
Thought about it and decided to post it anyway. How many people will see this blog anyway.

Since I am an absolute knitting novice I am now stuck: don't know how to finish the sweater.
The briefs are also not very haute couture.
Oh well, gotto start somewhere.

Hope I won't get blocked from Blogger by posting this. Let's call it 'art'.

Before:
Very boring. Clearly something is missing.


After:
Much better!


I won't post close-up pics. Am a bit of a woos.

The body was made with 16st in dpns. No idea how many rows. Arms and legs were all made with 4st i-cords. Arms were made separate and attached later. Ears were a 3st i-cord.

The girlfriend will get a set of boobies. Should not be too difficult to design.
And with a thin thread I will crochet a nice lingerie set.

All knitted with 2.5mm DPNs. Private bits: crochet hook 2mm.
Yarn used:
Body: Durable Glanskatoen nr 10, undied.
Briefs: Durable breikatoen, nr 12, white.
Sweater: Wibra coton.

Stylish flower

I am a big fan of the oriental crochet books. The designs are very nice. Very well blocked and then photographed in a no-nonsense way. The diagrams are very clear and I have not noticed any design flaws so far.

A while ago I found this book and the flower on the cover always stayed in my mind. So simple and so subtle.

A few days ago, on the 30th of April, our queen Beatrix abdicated and passed the crown over to her son Willem-Alexander. Despite living in Amsterdam I decided not to go into town but stay home and watch the ceremonies on TV. The broadcast started at around 8 am and finished around 9.30 pm. So many hours to crochet in front of the TV. So I finally started the flower.

I used Durable Glanskatoen nr 12 ecru and a 2 mm hook. I'm not sure what the brand of the pink thread is. This skein was a hand-me-down.
The chart and design was very simple. I soon noticed that my flower was going to be huge compared to the one in the picture. Way bigger than I expected. The finished flower is about 11 cm -just over 4 inch- in diameter. Next time I'll use much thinner thread. I made the stamen of single strands with a single knot at the end.

The chart:


The result:


I really like the wave.


Maybe for handy to know for future projects:


It was a fun and easy project.